Rapid PHP Deployment for IIS using a Batch File
30 January 2014 • by Bob • IIS, Scripting, IIS Express, PHP
Whenever I am delivering a presentation where I need to use PHP, I typically use a batch file that I wrote in order to rapidly deploy PHP on the system that I am using for my demos. The batch file usually takes less than a second to run, which always seems to amaze people in the audience. As a result, I usually have several people ask me for my batch file after each presentation, so I thought that it would make a good subject for today's blog.
I should mention that I have used this batch file in order to demonstrate PHP with IIS in a variety of scenarios, and one of my favorite demos is when I would borrow someone's laptop and plug in a flash drive where I had IIS Express pre-installed, and then I would run the batch file in this blog to deploy PHP. Next I would launch IIS Express, open a web browser on their system, and then browse to http://localhost/ in order to show that IIS Express was working correctly. Lastly I would write a simple PHP "Hello World" page to show that PHP was up-and-running on their system in a matter of seconds.
That being said, I have to point out that there is a very important prerequisite that you must have in order to follow the steps in the blog: you need to start with a known-good installation of PHP from one of your systems, and I'll explain what I mean by that.
My batch file expects to find a folder containing ready-to-run files for PHP in order to deploy PHP on a new system. I originally obtained my PHP files by using the Web Platform Installer (WebPI) to install PHP, and then I copied the files to my flash drive or some other repository. (Note that WebPI usually installs PHP in the "%ProgramFiles(x86)%\PHP" folder.) If you don't want to use WebPI, you can also download PHP from http://windows.php.net/, but you're on your own for configuration.
Once I have the files from a known-good installation of PHP, I create the following folder structure in the location where I will be storing the files that I use to deploy PHP on other systems:
- <root folder>
- SETUP_PHP.cmd (the batch file from this blog)
- PHP (the folder containing the PHP files)
- PHP.INI
- PHP-CGI.EXE
- etc. (all of the remaining PHP files and folders)
One thing to note is that the PHP.INI file you use may contain paths which refer to specific directories on the system from which you are copying your PHP files, so you need to make sure that those paths will exist on the system where you deploy PHP.
Here is an example: when I used WebPI to install PHP 5.5 on a system with IIS, it installed PHP into my "%ProgramFiles(x86)%\PHP\v5.5" folder. During the installation process, WebPI updated the PHP file to reflect any paths that need to be defined. At the time that I put together my notes for this blog, those updates mainly applied to the path where PHP expects to find it's extensions:
extension_dir="C:\Program Files (x86)\PHP\v5.5\ext\"
What this means is - if you want to deploy PHP to some other path on subsequent systems, you will need to update at least that line in the PHP.INI file that you are using to deploy PHP. In my particular case, I prefer to deploy PHP to the "%SystemDrive%\PHP" path, but it can be anywhere as long as you update everything accordingly.
The following batch file will deploy the PHP files in the "%SystemDrive%\PHP" folder on your system, and then it will update IIS with the necessary settings for this PHP deployment to work:
@echo off

REM Change to the installation folder
pushd "%~dp0"

REM Cheap test to see if IIS is installed
if exist "%SystemRoot%\System32\inetsrv" (
  REM Check for the PHP installation files in a subfolder
  if exist "%~dp0PHP" (
    REM Check for an existing installation of PHP
    if not exist "%SystemDrive%\PHP" (
      REM Create the folder for PHP
      md "%SystemDrive%\PHP"
      REM Deploy the PHP files
      xcopy /erhky "%~dp0PHP\*" "%SystemDrive%\PHP"
    )
    pushd "%SystemRoot%\System32\inetsrv"
    REM Configure the IIS settings for PHP
    appcmd.exe set config -section:system.webServer/fastCgi /+"[fullPath='%SystemDrive%\PHP\php-cgi.exe',monitorChangesTo='php.ini',activityTimeout='600',requestTimeout='600',instanceMaxRequests='10000']" /commit:apphost
    appcmd.exe set config -section:system.webServer/fastCgi /+"[fullPath='%SystemDrive%\PHP\php-cgi.exe',monitorChangesTo='php.ini',activityTimeout='600',requestTimeout='600',instanceMaxRequests='10000'].environmentVariables.[name='PHP_FCGI_MAX_REQUESTS',value='10000']" /commit:apphost
    appcmd.exe set config -section:system.webServer/fastCgi /+"[fullPath='%SystemDrive%\PHP\php-cgi.exe',monitorChangesTo='php.ini',activityTimeout='600',requestTimeout='600',instanceMaxRequests='10000'].environmentVariables.[name='PHPRC',value='%SystemDrive%\PHP']" /commit:apphost
    appcmd.exe set config -section:system.webServer/handlers /+"[name='PHP_via_FastCGI',path='*.php',verb='GET,HEAD,POST',modules='FastCgiModule',scriptProcessor='%SystemDrive%\PHP\php-cgi.exe',resourceType='Either']" /commit:apphost
    popd
  )
)
popd
Once you have all of that in place, it usually takes less than a second to deploy PHP, which is why so many people seem interested during my presentations.
Note that you can deploy PHP for IIS Express just as easily by updating the "%SystemRoot%\System32\inetsrv" paths in the batch file to "%ProgramFiles%\IIS Express" or "%ProgramFiles(x86)%\IIS Express" paths. You can also use this batch file as part of a deployment process for PHP within a web farm; in which case, you will need to pay attention to the paths inside your PHP.INI file which I mentioned earlier.
Note: This blog was originally posted at http://blogs.msdn.com/robert_mcmurray/
How to Create a Blind Drop WebDAV Share
17 September 2013 • by Bob • IIS, WebDAV, URL Rewrite
I had an interesting WebDAV question earlier today that I had not considered before: how can someone create a "Blind Drop Share" using WebDAV? By way of explanation, a Blind Drop Share is a path where users can copy files, but never see the files that are in the directory. You can setup something like this by using NTFS permissions, but that environment can be a little difficult to set up and maintain.
With that in mind, I decided to research a WebDAV-specific solution that didn't require mangling my NTFS permissions. In the end it was pretty easy to achieve, so I thought that it would make a good blog for anyone who wants to do this.
A Little Bit About WebDAV
NTFS permissions contain access controls that configure the directory-listing behavior for files and folders; if you modify those settings, you can control who can see files and folders when they connect to your shared resources. However, there are no built-in features for the WebDAV module which ships with IIS that will approximate the NTFS behavior. But that being said, there is an interesting WebDAV quirk that you can use that will allow you to restrict directory listings, and I will explain how that works.
WebDAV uses the PROPFIND command to retrieve the properties for files and folders, and the WebDAV Redirector will use the response from a PROPFIND command to display a directory listing. (Note: Official WebDAV terminology has no concept of files and folders, those physical objects are respectively called Resources and Collections in WebDAV jargon. But that being said, I will use files and folders throughout this blog post for ease of understanding.)
In any event, one of the HTTP headers that WebDAV uses with the PROPFIND command is the Depth header, which is used to specify how deep the folder/collection traversal should go:
- If you sent a
PROPFINDcommand for the root of your website with aDepth:0header/value, you would get the properties for just the root directory - with no files listed; aDepth:0header/value only retrieves properties for the single resource that you requested. - If you sent a
PROPFINDcommand for the root of your website with aDepth:1header/value, you would get the properties for every file and folder in the root of your website; aDepth:1header/value retrieves properties for the resource that you requested and all siblings. - If you sent a
PROPFINDcommand for the root of your website with aDepth:infinityheader/value, you would get the properties for every file and folder in your entire website; aDepth:infinityheader/value retrieves properties for every resource regardless of its depth in the hierarchy. (Note that retrieving directory listings with infinite depth are disabled by default in IIS 7 and IIS 8 because it can be CPU intensive.)
By analyzing the above information, it should be obvious that what you need to do is to restrict users to using a Depth:0 header/value. But that's where this scenario gets interesting: if your end-users are using the Windows WebDAV Redirector or other similar technology to map a drive to your HTTP website, you have no control over the value of the Depth header. So how can you restrict that?
In the past I would have written custom native-code HTTP module or ISAPI filter to modify the value of the Depth header; but once you understand how WebDAV works, you can use the URL Rewrite module to modify the headers of incoming HTTP requests to accomplish some pretty cool things - like modifying the values WebDAV-related HTTP headers.
Adding URL Rewrite Rules to Modify the WebDAV Depth Header
Here's how I configured URL Rewrite to set the value of the Depth header to 0, which allowed me to create a "Blind Drop" WebDAV site:
- Open the URL Rewrite feature in IIS Manager for your website.

Click image to expand - Click the Add Rules link in the Actionspane.

Click image to expand - When the Add Rules dialog box appears, highlight Blank rule and click OK.

Click image to expand - When the Edit Inbound Rulepage appears, configure the following settings:
- Name the rule "Modify Depth Header".

Click image to expand - In the Match URLsection:
- Choose Matches the Pattern in the Requested URL drop-down menu.
- Choose Wildcards in the Using drop-down menu.
- Type a single asterisk "*" in the Pattern text box.

Click image to expand - Expand the Server Variables collection and click Add.

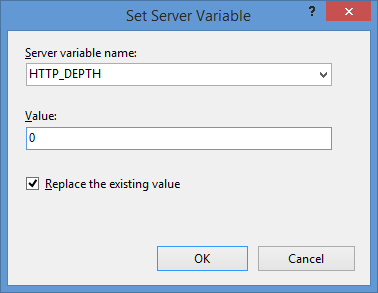
Click image to expand - When the Set Server Variabledialog box appears:
- Type "HTTP_DEPTH" in the Server variable name text box.
- Type "0" in the Value text box.
- Make sure that Replace the existing value checkbox is checked.
- Click OK.
- In the Action group, choose None in the Action typedrop-down menu.

Click image to expand - Click Apply in the Actions pane, and then click Back to Rules.

Click image to expand
- Name the rule "Modify Depth Header".
- Click View Server Variables in the Actionspane.

Click image to expand - When the Allowed Server Variablespage appears, configure the following settings:
- Click Add in the Actionspane.

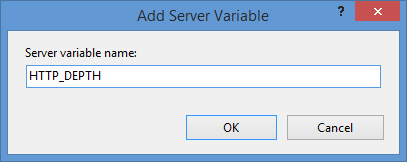
Click image to expand - When the Add Server Variabledialog box appears:
- Type "HTTP_DEPTH" in the Server variable name text box.
- Click OK.
- Click Back to Rules in the Actionspane.

Click image to expand
- Click Add in the Actionspane.
If all of these changes were saved to your applicationHost.config file, the resulting XML might resemble the following example - with XML comments added by me to highlight some of the major sections:
<location path="Default Web Site">
    <system.webServer>

        <-- Start of Security Settings -->
        <security>
            <authentication>
                <anonymousAuthentication enabled="false" />
                <basicAuthentication enabled="true" />
            </authentication>
            <requestFiltering>
                <fileExtensions applyToWebDAV="false" />
                <verbs applyToWebDAV="false" />
                <hiddenSegments applyToWebDAV="false" />
            </requestFiltering>
        </security>

        <-- Start of WebDAV Settings -->
        <webdav>
            <authoringRules>
                <add roles="administrators" path="*" access="Read, Write, Source" />
            </authoringRules>
            <authoring enabled="true">
                <properties allowAnonymousPropfind="false" allowInfinitePropfindDepth="true">
                    <clear />
                    <add xmlNamespace="*" propertyStore="webdav_simple_prop" />
                </properties>
            </authoring>
        </webdav>

        <-- Start of URL Rewrite Settings -->
        <rewrite>
            <rules>
                <rule name="Modify Depth Header" enabled="true" patternSyntax="Wildcard">
                    <match url="*" />
                    <serverVariables>
                        <set name="HTTP_DEPTH" value="0" />
                    </serverVariables>
                    <action type="None" />
                </rule>
            </rules>
            <allowedServerVariables>
                <add name="HTTP_DEPTH" />
            </allowedServerVariables>
        </rewrite>

    </system.webServer>
</location>
In all likelihood, some of these settings will be stored in your applicationHost.config file, and the remaining settings will be stored in the web.config file of your website.
Testing the URL Rewrite Settings
If you did not have the URL Rewrite rule in place, or if you disabled the rule, then your web server might respond like the following example if you used the WebDAV Redirector to map a drive to your website from a command prompt:
C:\>net use z: http://www.contoso.com/
Enter the user name for 'www.contoso.com': www.contoso.com\robert
Enter the password for www.contoso.com:
The command completed successfully.

C:\>z:

Z:\>dir
Volume in drive Z has no label.
Volume Serial Number is 0000-0000

Directory of Z:\

09/16/2013 08:55 PM <DIR> .
09/16/2013 08:55 PM <DIR> ..
09/14/2013 12:39 AM <DIR> aspnet_client
09/16/2013 08:06 PM <DIR> scripts
09/16/2013 07:55 PM 66 default.aspx
09/14/2013 12:38 AM 98,757 iis-85.png
09/14/2013 12:38 AM 694 iisstart.htm
09/16/2013 08:55 PM 75 web.config
              4 File(s) 99,592 bytes
              8 Dir(s) 956,202,631,168 bytes free

Z:\>
However, when you have the URL Rewrite correctly configured and enabled, connecting to the same website will resemble the following example - notice how no files or folders are listed:
C:\>net use z: http://www.contoso.com/
Enter the user name for 'www.contoso.com': www.contoso.com\robert
Enter the password for www.contoso.com:
The command completed successfully.

C:\>z:

Z:\>dir
Volume in drive Z has no label.
Volume Serial Number is 0000-0000

Directory of Z:\

09/16/2013 08:55 PM <DIR> .
09/16/2013 08:55 PM <DIR> ..
              0 File(s) 0 bytes
              2 Dir(s) 956,202,803,200 bytes free

Z:\>
Despite the blank directory listing, you can still retrieve the properties for any file or folder if you know that it exists. So if you were to use the mapped drive from the preceding example, you could still use an explicit directory command for any object that you had uploaded or created:
Z:\>dir default.aspx
Volume in drive Z has no label.
Volume Serial Number is 0000-0000

Directory of Z:\

09/16/2013 07:55 PM 66 default.aspx
              1 File(s) 66 bytes
              0 Dir(s) 956,202,799,104 bytes free

Z:\>dir scripts
Volume in drive Z has no label.
Volume Serial Number is 0000-0000

Directory of Z:\scripts

09/16/2013 07:52 PM <DIR> .
09/16/2013 07:52 PM <DIR> ..
              0 File(s) 0 bytes
              2 Dir(s) 956,202,799,104 bytes free

Z:\>
The same is true for creating directories and files; you can create them, but they will not show up in the directory listings after you have created them unless you reference them explicitly:
Z:\>md foobar

Z:\>dir
Volume in drive Z has no label.
Volume Serial Number is 0000-0000

Directory of Z:\

09/16/2013 11:52 PM <DIR> .
09/16/2013 11:52 PM <DIR> ..
              0 File(s) 0 bytes
              2 Dir(s) 956,202,618,880 bytes free

Z:\>cd foobar

Z:\foobar>copy NUL foobar.txt
        1 file(s) copied.

Z:\foobar>dir
Volume in drive Z has no label.
Volume Serial Number is 0000-0000

Directory of Z:\foobar

09/16/2013 11:52 PM <DIR> .
09/16/2013 11:52 PM <DIR> ..
              0 File(s) 0 bytes
              2 Dir(s) 956,202,303,488 bytes free

Z:\foobar>dir foobar.txt
Volume in drive Z has no label.
Volume Serial Number is 0000-0000

Directory of Z:\foobar

09/16/2013 11:53 PM 0 foobar.txt
              1 File(s) 0 bytes
              0 Dir(s) 956,202,299,392 bytes free

Z:\foobar>
That wraps it up for today's post, although I should point out that if you see any errors when you are using the WebDAV Redirector, you should take a look at the Troubleshooting the WebDAV Redirector section of my Using the WebDAV Redirector article; I have done my best to list every error and resolution that I have discovered over the past several years.
Note: This blog was originally posted at http://blogs.msdn.com/robert_mcmurray/